There’s something about the perfect blend of crunchy nuts and sweet cherries that just screams holiday magic. That’s why this Christmas Nut Cherry Cookies Recipe holds a special place in my kitchen during the festive season. The buttery dough paired with festive cherries and nuts creates a cookie that’s as joyful to eat as it is to share.

Jump to:
Why You'll Love This Recipe
I’ve made quite a few holiday cookies over the years, and this Christmas Nut Cherry Cookies Recipe still manages to stand out. It’s the nostalgia in every bite combined with a texture that’s just right – crunchy but tender, chewy with those bright cherry bursts. It’s an all-around crowd-pleaser you’ll be thrilled to bake and gift.
- Simple Ingredients: You only need a few pantry staples plus nuts and cherries, making it easy to whip up anytime.
- Great Make-Ahead Dough: Chilling the dough lets the flavors meld and makes slicing a breeze.
- Perfect Holiday Flavor: Candied cherries add that classic Christmas vibe without being overpowering.
- Texture Mastery: The nuts bring crunch, the cherries bring chew, and the buttery dough ties it all together beautifully.
Ingredients & Why They Work
Each ingredient here plays a crucial role in creating the perfect harmony of flavor and texture. Using quality nuts and real candied cherries really elevates the cookies from good to unforgettable. Plus, the balance in sweetness and richness is just right, so take your time picking the best versions you can find.
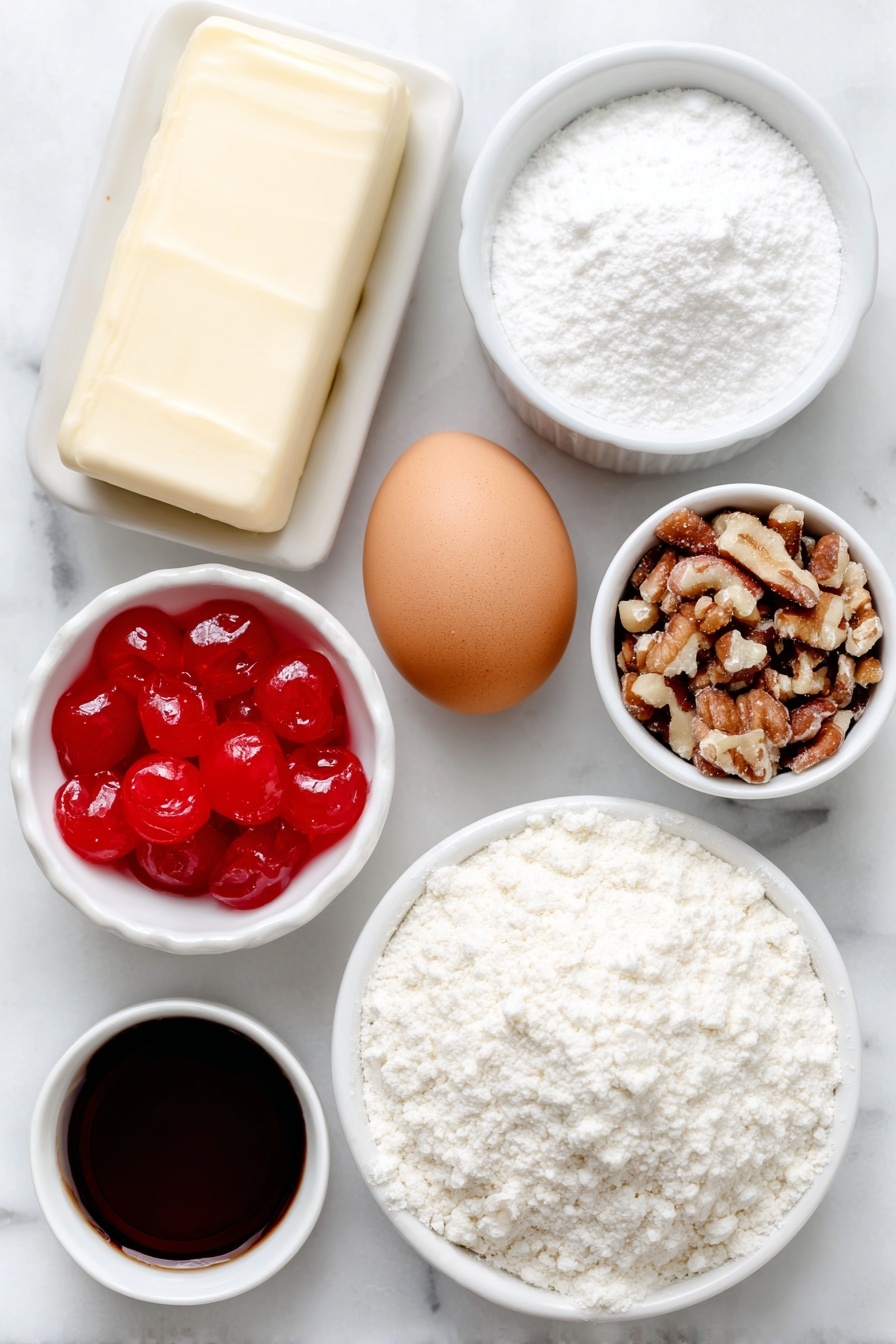
- Butter: Unsalted butter lends richness and helps with that melt-in-your-mouth texture.
- Powdered sugar: Gives a subtle sweetness and contributes to the delicate crumb.
- Egg: Binds everything together and adds moisture.
- Vanilla: Adds warmth and depth of flavor; don’t skip it!
- All-purpose flour: The base of the dough giving structure and a tender crumb.
- Chopped nuts: I like walnuts or pecans that add crunch and a nutty flavor.
- Candied cherries: The festive burst of color and chewy sweetness that really makes these cookies special.
Make It Your Way
I love how flexible this Christmas Nut Cherry Cookies Recipe is—you can easily tweak the nuts or cherries depending on your preferences or what’s in the pantry. I’ve experimented a bit over the years, and I’m sure you’ll find your favorite variation too.
- Nut substitution: I swapped pecans for walnuts once and loved the slightly sweeter, buttery crunch they gave.
- Cherry twist: Try mixing half dried cranberries with the cherries for a tart surprise.
- Gluten-free option: I made these with a gluten-free flour blend and had great results—just watch those chilling times.
- Extra festive: Add a sprinkle of cinnamon or nutmeg to the dough for a warm holiday spice kick.
Step-by-Step: How I Make Christmas Nut Cherry Cookies Recipe
Step 1: Cream the butter and powdered sugar
Start by beating the room-temperature butter with powdered sugar until it’s smooth and fluffy. This step is key because it creates a light texture in the dough and helps the cookies hold together nicely. I usually mix for about 3-4 minutes until it's pale and creamy.
Step 2: Add egg and vanilla
Next, incorporate the egg and vanilla extract thoroughly. This adds moisture and that irresistible vanilla note that enhances all the other flavors. I like to beat it just enough so the mixture looks uniform but not overdo it.
Step 3: Gently mix in the dry ingredients
Turn your mixer to low and add the flour, chopped nuts, and candied cherries. Mix just until everything is combined to keep the dough tender and avoid overworking the gluten. At this stage, I always stop when the ingredients come together—your dough should still look a bit chunky with the cherries and nuts visible.
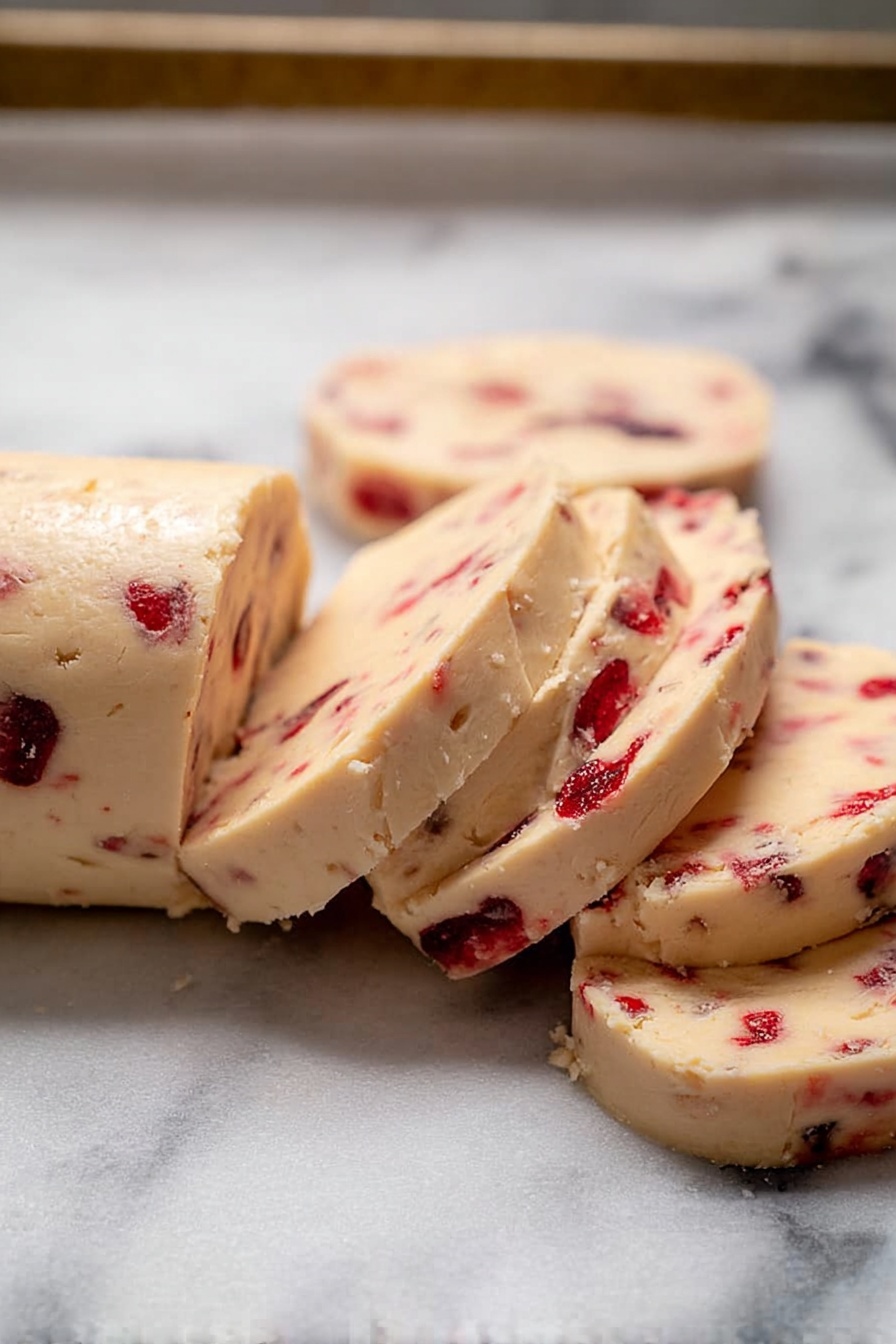
Step 4: Roll into logs and chill
Divide the dough into two logs on some plastic wrap, wrap them tightly, and pop them in the fridge for at least an hour. I find chilling makes slicing cleaner and lets the flavors develop. You can even chill overnight if you want to prep early.
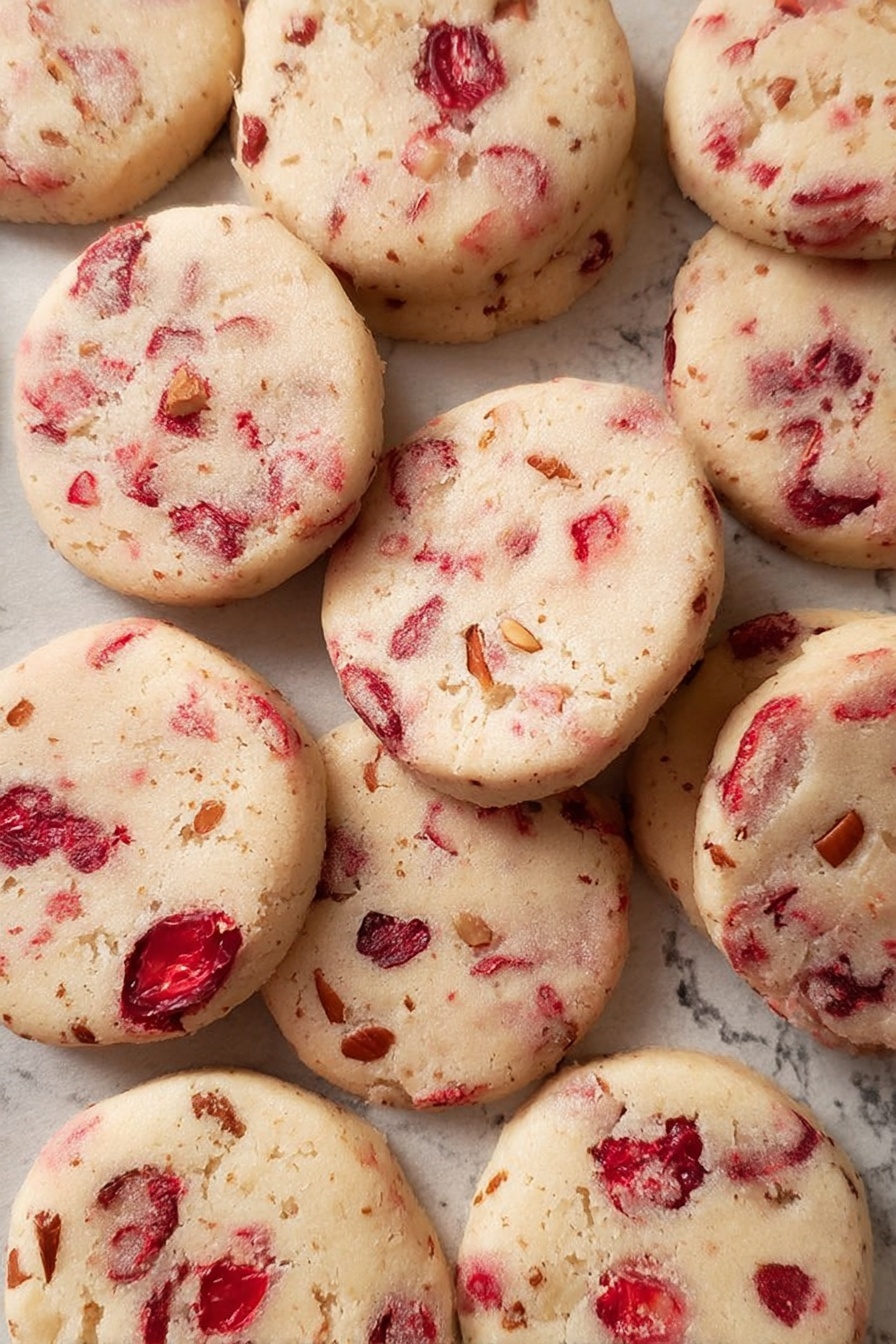
Step 5: Slice and bake
Preheat your oven to 325°F. Slice the logs into about ¼-inch thick rounds and arrange them on a baking sheet lined with parchment. Bake for 13-15 minutes until the edges are just set and a soft golden hue appears. Don’t overbake—you want a delicate snap, not a hard crunch.
Top Tip
Over the years of making this Christmas Nut Cherry Cookies Recipe, I’ve learned a few tricks that really make a difference in the final result. These tips will save you time and keep your cookies looking and tasting like they came from a bakery.
- Chill the dough well: This keeps the dough firm and helps maintain those beautiful cherry and nut chunks without smushing.
- Slice carefully: Using a sharp knife and a gentle sawing motion prevents squashing your logs and keeps cookies evenly thick.
- Don’t overbake: The cookies may look a little soft when you pull them out, but they firm up as they cool—don’t wait for a golden-brown all over.
- Use parchment paper: This prevents sticking and helps with even baking.
How to Serve Christmas Nut Cherry Cookies Recipe
Garnishes
I like to sprinkle a little powdered sugar on top just before serving—it adds a delicate snowy look perfect for the holidays. Sometimes I gently press a half maraschino cherry or a pecan half on top before baking for a charming, festive touch.
Side Dishes
These cookies go wonderfully with a cup of hot cocoa, mulled wine, or a fresh brew of Christmas-spiced coffee. I also love pairing them with a simple cheese platter to balance the sweetness when hosting a holiday gathering.
Creative Ways to Present
For gift-giving, I like stacking these cookies in a pretty tin layered with parchment and tied with festive ribbon. They also make a lovely edible centerpiece when arranged on a decorative plate surrounded by pine sprigs and holly berries for extra holiday cheer.
Make Ahead and Storage
Storing Leftovers
After baking, let the cookies cool completely and store them in an airtight container at room temperature. They'll stay fresh for up to a week, and honestly, they rarely last that long in my house! Keeping them away from humidity is key to preserving that perfect crunch.
Freezing
Want to prep ahead? The dough logs freeze beautifully wrapped tightly in plastic wrap and then foil. When you’re ready, just thaw overnight in the fridge before slicing and baking—this has saved me on busy holiday days more than once!
Reheating
If you have leftovers that have lost a bit of their crispness, warming them in a low oven (about 300°F for 5 minutes) will refresh their texture without drying them out. Just watch carefully to avoid overbaking.
Frequently Asked Questions:
Yes! You can swap candied cherries for dried cherries if you prefer a less sweet option, but keep in mind dried cherries are less sticky so the texture of the cookies will vary slightly.
Chopped nuts add texture and flavor, but if you have allergies or prefer nut-free cookies, you can omit them or replace with seeds like sunflower seeds. The cookies will still be delicious!
Slice the dough into rounds about ¼-inch thick. Thinner slices may bake too fast and become too crisp, while thicker slices may need more time and be denser.
Absolutely! The dough logs freeze well and can be sliced and baked straight from the fridge or after thawing. This makes holiday baking much more manageable.
Final Thoughts
This Christmas Nut Cherry Cookies Recipe feels like a warm hug on a chilly winter day. Every year, pulling out this recipe card makes me feel connected to holiday traditions, and sharing these cookies with friends and family is one of my favorite parts of the season. I hope you’ll bake these cookies with the same joy and care—you’ll be rewarded with smiles and happy hearts around your table.
Print
Christmas Nut Cherry Cookies Recipe
- Prep Time: 10 minutes
- Cook Time: 15 minutes
- Total Time: 1 hour 25 minutes
- Yield: 36 cookies
- Category: Dessert
- Method: Baking
- Cuisine: American
Description
Ann Roger's Christmas Cookies are festive, nutty, and studded with colorful candied cherries, perfect for holiday celebrations. These buttery cookies are rolled into logs, chilled, sliced, and baked to a delicate golden edge for a classic holiday treat.
Ingredients
Cookie Dough
- 1 cup (2 sticks) butter
- 1 cup powdered sugar
- 1 egg
- 1 teaspoon vanilla extract
- 2 ¼ cups all-purpose flour
- 1 cup chopped nuts
- 2 cups candied cherries
Instructions
- Cream butter and sugar: In a large bowl, cream together the butter and powdered sugar until the mixture is light and fluffy, ensuring the sugar is fully incorporated.
- Add egg and vanilla: Thoroughly mix in the egg and vanilla extract until well combined to create a smooth batter.
- Incorporate dry ingredients: On low speed, slowly add the all-purpose flour, chopped nuts, and candied cherries to the wet mixture, stirring just until combined to avoid overworking the dough.
- Form and chill dough: Divide the dough into two logs, wrap each tightly in plastic wrap, and chill in the refrigerator for 1 hour to firm up for easier slicing.
- Preheat oven: When ready to bake, preheat the oven to 325°F (163°C) and prepare a baking sheet by lining it with parchment paper or a silicone mat.
- Slice and bake: Remove the chilled dough logs from the fridge, slice into rounds about ¼-inch thick, place them evenly spaced on the baking sheet, and bake for 15 minutes or until the edges have set and the cookies are just barely golden.
- Cool and serve: Let the cookies cool on the baking sheet for a few minutes before transferring to a wire rack to cool completely. Enjoy your festive Christmas cookies!
Notes
- Use fresh butter for the best flavor and texture in the cookies.
- Chilling the dough is essential to maintain the shape and make slicing easier.
- Slice the cookies evenly to ensure uniform baking.
- Walnuts or pecans are great alternatives for chopped nuts.
- Store cookies in an airtight container at room temperature for up to 1 week or freeze for longer storage.
Nutrition
- Serving Size: 1 cookie
- Calories: 150 kcal
- Sugar: 8 g
- Sodium: 40 mg
- Fat: 9 g
- Saturated Fat: 5 g
- Unsaturated Fat: 3 g
- Trans Fat: 0 g
- Carbohydrates: 15 g
- Fiber: 1 g
- Protein: 2 g
- Cholesterol: 30 mg


Leave a Reply